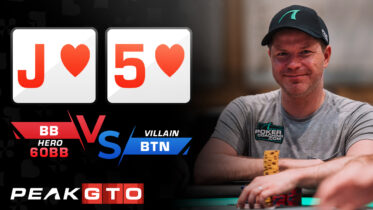
Try This Hand Yourself
Play this exact spot against the solver in PeakGTO before reading the analysis.
The whole point of building a pot while you are drawing is to get paid when the draw arrives. A flush draw that limps to showdown wins a small pot; a flush draw that bets the turn and then jams the river can win a stack. The river decision feels easy once the flush gets there, but the size is not, and the temptation to bet timidly out of fear costs more than most players realize. This hand is the mirror image of a busted draw: same flop, same turn, but the river completes the flush, and the question shifts from “how do I bluff” to “how much can I get in for value.” The answer is a lot.
Today we will analyze a 60bb 8-handed tournament hand where the big blind defends J♥5♥ against a button open, flops a combo draw (flush draw plus a gutshot) on 7♠4♥3♥, leads the turn, and completes the flush on a Q♥ river. Here is why the flop checks through, how to size the turn lead with a draw, and the river lesson that trips up so many players: once the flush gets there, even a non-nut flush wants to bet enormously. The same line that would have bluffed a brick now jams for maximum value.
Assumptions
- Stacks: 60bb effective
- Format: 8-handed MTT
- Positions: BB (Hero) vs BTN (Villain)
- Action: BTN opens, BB calls
- Flop: 7♠4♥3♥ two-tone, checks through (Pot: 6.1bb)
- Turn: 8♠ (Pot: 6.1bb)
- River: Q♥ (Pot: 14.3bb)
Preflop
The button opens and the big blind calls with J♥5♥, a hand that could also mix in a 3-bet but is a comfortable flat. From the big blind, Hero will be out of position the whole way, which is precisely why the plan is to play the draw aggressively rather than passively. Position dictates that you cannot rely on pot control alone; you have to take the betting lead at the right moments to build the pot you will want when the draw comes in.
Flop: 7♠4♥3♥
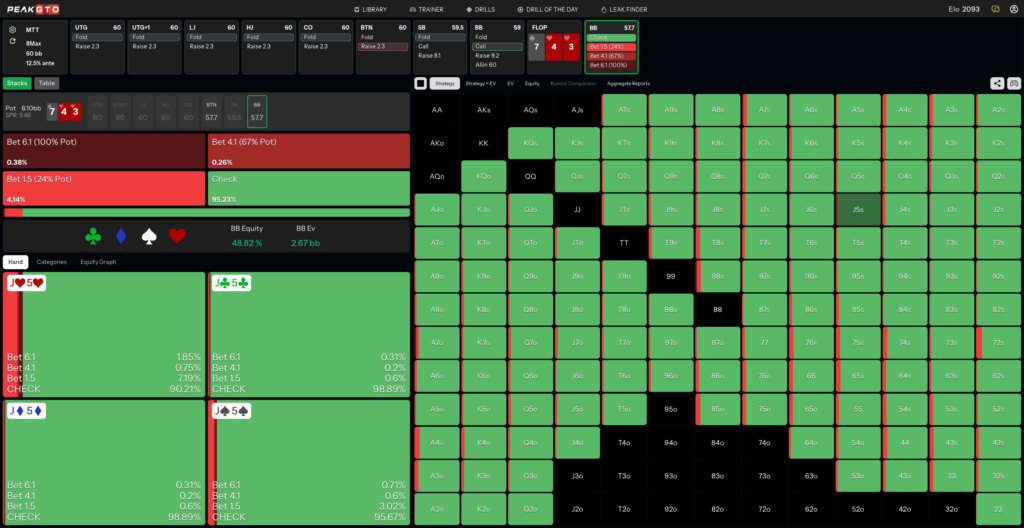
J♥5♥ flops a heart flush draw and a gutshot to the six, a true combo draw. Despite the equity, this is not a hand to lead into the preflop raiser. Playing out of position, the big blind keeps its range together by checking, and the draw checks with everything else. Donking would isolate the hand and bloat the pot when the cheaper plan is simply to see the turn. The big blind checks, the button checks back, and the flop goes check-check. That checked-through flop is what hands the betting lead to the big blind on the next street.
The check-back is also informative. When the button passes up a flop bet, it is signaling a capped range that has mostly checked back its medium and weak hands rather than betting its strongest holdings. That capped range is exactly what the big blind wants to attack on the turn while holding a draw that can improve to a strong hand.
Turn: 8♠
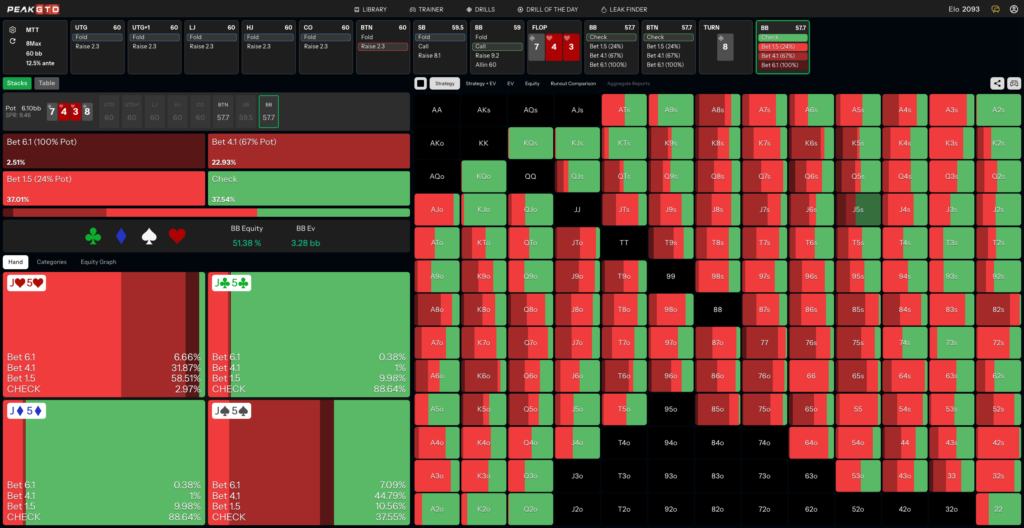
On the 8♠ turn, J♥5♥ still has its flush draw and gutshot, and the big blind leads a large chunk of the time. There is a sizing rule worth memorizing here, and it runs the opposite way to most people’s instinct: a clean flush draw is perfectly happy to get called, so it has no need to size up for fold equity. PeakGTO bets J♥5♥ the small 1.5bb size most often, mixing in the medium 4.1bb bet, about two-thirds of the pot, that Hero uses here. The biggest sizes are reserved for the vulnerable made hands and the weaker draws that most want to fold the opponent out. Either way, betting builds the pot for the times the flush completes and pressures the button’s weak checked-back range right now. The button calls, leaving roughly 14.3bb in the middle by the river.
Notice how the turn bet does double duty. If the river bricks, the big blind still has fold equity and a credible bluffing story built from this exact line. If the river completes the flush, the pot is already inflated, so the river jam is a natural continuation rather than a sudden, suspicious spike in aggression. That is the quiet value of leading the turn with a draw: it makes both outcomes profitable. A passive line that just calls the flop and checks the turn would arrive at the river with a tiny pot and a hand that has to choose between a small, easily-read value bet and giving up. Betting the draw keeps every option open and every line believable.
River: Q♥
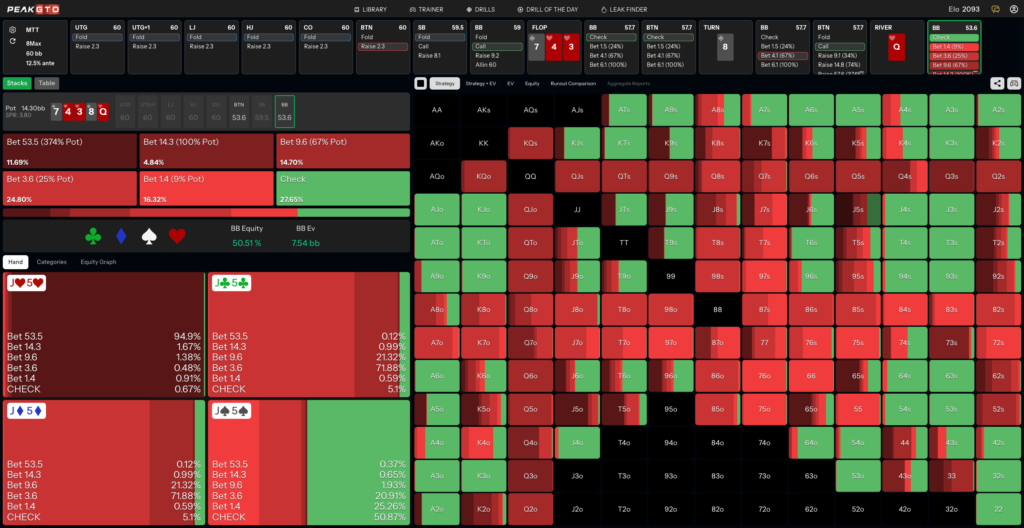
The Q♥ completes the flush. J♥5♥ now holds a queen-high flush, which is not the nuts but is enormously strong given the action. The instinct many players feel here is to bet small and “make sure I get called,” afraid the opponent might have a better flush. While thinner holdings in the range do take a small size, the made flush wants to bet huge: the solver jams an overbet, and J♥5♥ shoves around 53.5bb, roughly 3.75 times the pot, the vast majority of the time. A lot of these flushes, really king-high and worse, are shoving.
The reason this works is range composition. When the button called the turn bet, it kept a lot of marginal made hands and very few flushes, because most of its heart combinations were already gone. So the queen-high flush is almost always the best hand, and even when it is not, it has so much value that betting huge prints. The logic flips for bluffs on this card: the hands you want to bluff are the ones holding a heart, because a heart blocks the opponent’s flush and the auto-call that comes with it, while busted spade draws make poor bluffs. The made flush, of course, just wants value. This is a clean illustration of how GTO separates value and bluffs by blockers and by how capped the opponent is.
There is a sensible real-world caveat. In a tournament you would usually avoid the full 3.75x-pot jam, because the one time you run into a higher flush you are out of the event. A pot-sized to 1.5x-pot bet captures nearly all the value with less variance and the same range. The principle survives the adjustment intact: when your flush gets there against a capped range, bet big. Hero jams, and the button folds something like a pair of fours, the kind of hand that fills out the opponent’s range precisely because it could not call a giant bet.
It is worth contrasting this river with its mirror image, the same hand on a brick. There, jack-high would have no showdown value and would bluff as a busted draw. Here the heart turns that same hand into a value monster, and the bet size balloons accordingly. The two rivers share a line and a hand yet demand opposite goals: one bets to make better hands fold, the other bets to make worse hands call. Recognizing which world you are in, and sizing for that goal rather than splitting the difference, is the entire skill. Betting a completed flush timidly is the same mistake as bluffing a brick without the right blockers, just in the other direction.
Key Takeaways
- Flop: The combo draw checks. From out of position, keep your range together and take the free card with J♥5♥ when the flop checks through.
- Turn: Lead the 8♠ to build the pot. A clean flush draw is happy to be called, so it does not need the biggest size: J♥5♥ most often bets small, mixing in the 4.1bb medium size.
- River: When the flush completes against a capped range, even a non-nut flush jams an overbet. The opponent has few hearts after calling the turn, so a king-high-or-worse flush bets an enormous amount for value.
- Overall: The aggressive line, checking the flop and leading the turn, is what makes the river jam possible. Build the pot while drawing, then bet big when the draw arrives rather than betting scared, and remember that the same line plays for value here and as a blocker bluff when the river bricks instead.