The hardest part of running a multi-street bluff is knowing when to keep firing and when to slow down. On a paired board, the threat of trips lets you attack aggressively, but not every turn card deserves a second barrel, and not every river deserves a jam. The same hand can correctly check-raise the flop, check the turn, and then bet small on the river, with each decision driven by exactly how much equity and blocker value the runout provides. This hand is a clinic in adjusting a bluff to the board.
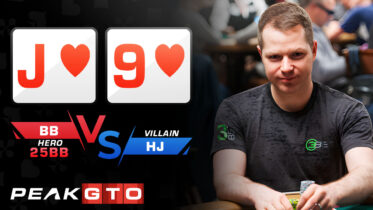
Today we will analyze a 25bb 8-handed tournament hand where the hijack opens, the big blind defends J♥9♥, and the flop comes Q♠Q♥6♦. Hero check-raises the paired board with a backdoor draw, then has to navigate a turn that misses and a river that misses again. Unlike a hand where the turn brings fresh equity, here Hero checks the brick turn and then settles for a small bluff on the river.
Assumptions
- Stacks: 25bb effective
- Format: 8-handed MTT, 12.5% ante
- Positions: BB (Hero) vs HJ (Villain)
- Action: HJ opens, BB calls
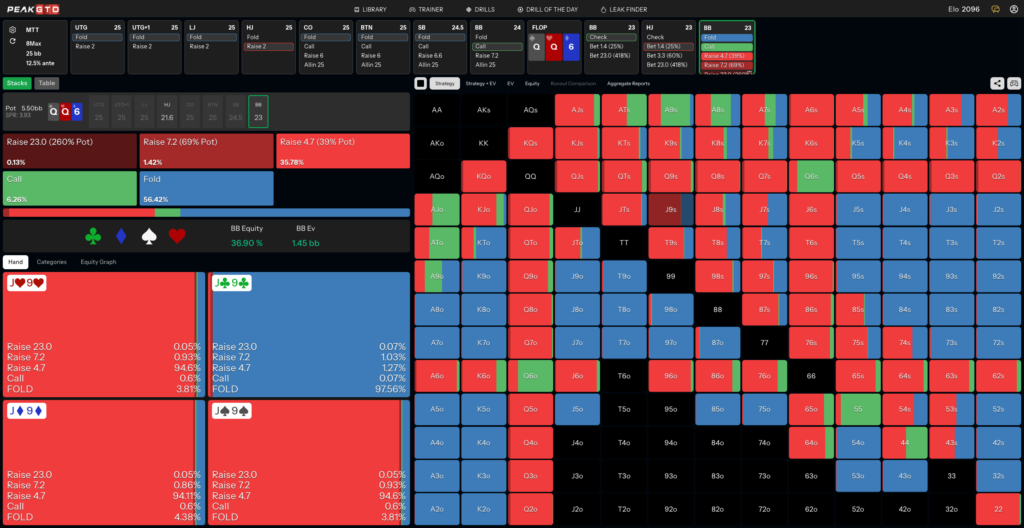
- Flop: Q♠Q♥6♦ (Pot: 5.5bb), Hero check-raises to 4.7bb
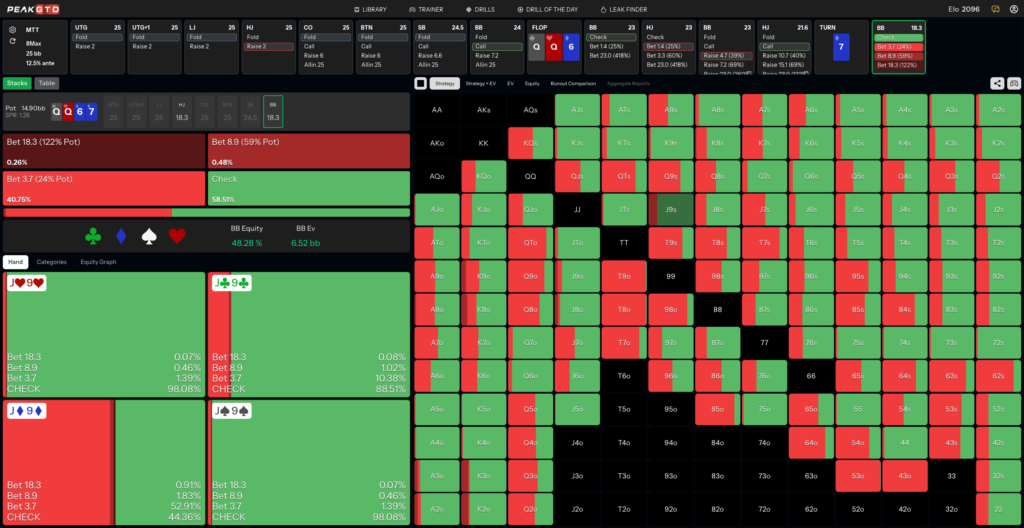
- Turn: 7♦ (Pot: 14.9bb), Hero checks, HJ checks back
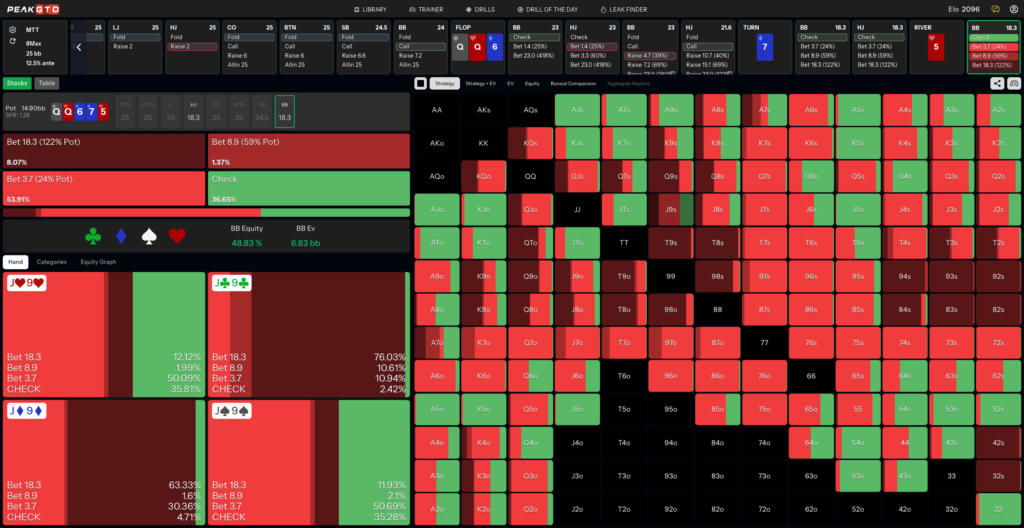
- River: 5♥ (Pot: 14.9bb), Hero bets 3.7bb
Preflop
J9s is a standard big blind defend against the hijack open at 25bb, a suited connector that flops plenty of draws and lives in Hero’s wide defending range. Hero calls, and we go to the flop heads-up and out of position with 5.5bb in the pot, ready to use the texture rather than rely on making a pair.
Flop: Q♠Q♥6♦
Hero checks the whole range, and the hijack fires a small continuation bet of 1.4bb. On this paired board, where the hijack holds most of the trip queens and Hero has almost none because Hero calls offsuit queens preflop, the correct response is to check-raise the vast majority of the continuing range. Hero raises to 4.7bb with the J♥9♥, and this raise is correct every single time, even though the solver technically folds it about 4% of the time.
What qualifies as a reasonable backdoor draw to check-raise is worth defining precisely. The hand needs a backdoor straight draw or an overcard to the six. J♥9♥ has a backdoor straight draw plus two overcards to the six (and even a backdoor flush draw), so it clears the bar easily. By contrast, a hand like J♥4♥ does not qualify, because it has no backdoor straight draw and the four is below the six. J♥7♥, however, does qualify thanks to its overcard. Being very aggressive here is fine in practice, because most opponents struggle to defend correctly against the small flop check-raise. The hijack calls, and we go to the turn.
Turn: 7♦
The 7♦ is the key card, and the rule it illustrates is simple: keep barreling the draws that pick up equity, and check the ones that do not. When you turn an actual straight draw or flush draw, or even a fresh gutshot, you often keep firing. But J9 gains nothing from the seven. PeakGTO reflects this by checking J9 the majority of the time, alongside the other hands that held a backdoor straight draw with an overcard but failed to improve, such as JT, KT, and KJ.
This is the crucial contrast with a card that does help. If the turn had given Hero a fresh draw, like a T9 picking up a straight draw on the seven, the hand would keep betting small every time. Because the seven bricks for J9, Hero simply checks and is largely done with the hand. If Hero checks and the hijack bets small, J9 folds without hesitation. There is no obligation to keep bluffing a hand that has no equity and no fresh draw. The hijack checks back, and we go to the river with the pot still at 14.9bb.
It is worth appreciating how the turn check protects the rest of Hero’s range. If Hero barreled every backdoor draw regardless of the card, the check would scream weakness, and good opponents would attack it relentlessly. By checking the bricks and only continuing with the hands that gained equity, Hero arrives at the river with a balanced checking range that still contains some sixes and its few queens for protection. That balance is exactly what makes the river bluff credible: the opponent cannot simply assume a checked turn means Hero has given up.
River: 5♥
The 5♥ misses Hero again, but the turn check actually reopened the door to bluffing. The right question is, what is the genuine bottom of Hero’s range on this Q-Q-6-7-5 runout? Walk through it: 43 makes a straight, 53 and 63 make a pair, every seven-x pairs, and the relevant nine-x holding, 98, makes a straight. Once you remove all of those, the weakest hands Hero can hold are around ten-high. The T9 and T8s combos rip it all in, and if those are the floor, then J8 and J9 are not far behind them. As a result, J♥9♥ mixes between jamming, betting small, and checking to give up.
Why split the bluffs into two sizes? Because the made hands at the bottom of the value range, like a hand that paired the six, are good enough for a small value bet, and Hero wants to keep a jamming range made up of the best queens. To stay balanced, the bluffs are divided too. The all-in jam is reserved for hands that block the opponent’s auto-calls, which on this board are the straights, so T9, T8, J9, J8, K9, K8, and A8 take the shove a fraction of the time because they remove some of the straight combos from the hijack’s range. With J9, the safer route is a small bet, just 3.7bb.
The small bet looks like it should never work, since the opponent gets such a good price, and indeed against a balanced range they only fold about 21% of the time. But that is the point: the pot odds mean betting 3.7bb into a roughly 15bb pot only needs to succeed about 20% of the time to profit. And the real-world picture is even better. Many opponents will not bluff-shove a hand like K10, K9, or A9 against the small bet the way the solver demands; they simply fold. They also tend to strip their queens out of their river range by re-raising the flop or barreling the turn, leaving their river holdings far weaker than they should be. Both leaks make Hero’s small GTO river bluff considerably more profitable than the raw numbers suggest.
Hero bets 3.7bb, the hijack folds KJ, and the small bluff takes it down. The lesson is the discipline of the line as a whole: an aggressive flop, a patient turn check when the card bricks, and a low-risk river stab that prints against the typical opponent. Knowing when not to fire the second barrel is what makes the third one cheap and effective.
Key Takeaways
- Flop: Check-raise the paired board with a backdoor draw. A hand qualifies if it has a backdoor straight draw or an overcard to the low card, like J♥9♥; pure overcard-less junk does not.
- Turn: Barrel the draws that gain equity and check the ones that brick. The 7 misses J9 entirely, so Hero checks and is done, rather than firing a second bullet with no equity.
- River: After the turn checks through, J9 becomes a thin bluff again. Jam the bluffs that block straights and bet small with the rest. A 3.7bb stab only needs about 20% folds to profit.
- Overall: The same backdoor draw plays three different ways depending on the runout. Aggression on the right street and restraint on the wrong one is the heart of profitable bluffing on a paired board, where the price you lay yourself is the whole question.